


Using NetBeans as a HTML editor
In order to get Netbeans setup as a decent HTML development environment, we first need to install it. On Fedora, start a terminal and login as root (or use sudo if you like), and enter:
yum install netbeans
In addition, we're going to setup Apache so we can use the 'Run Project' feature to view our website. Apache is a webserver program, also referred to as httpd (short for HTTP daemon, daemon being another term for service).
Installing Apache
To install the webserver, mods and a GUI configuration tool, do:
yum install httpd mod_ssl mod_python system-config-httpd
We now need to make some changes to the config file. Normally we could do this using the graphical interface, but this has a bug at present... see https://bugzilla.redhat.com/show_bug.cgi?id=528638.
Load up the configuration file as the root user as below (you can substitute nano with gedit, vi or whatever text editor you prefer).
nano /etc/httpd/conf/httpd.conf
Find Section 2, then find the commented out line starting with #ServerName (around line 262). Underneath this line, add the following:
ServerName 127.0.0.1:80
This sets the ServerName to 127.0.0.1, also known as localhost or the network loopback address.
We want to add a virtual host which we want to point at a folder in our home drive. First, create a folder that you want to store your html files in (or use an existing folder of course). Add the following text to the end of the /etc/httpd.conf configuration file, ensuring you replace the ServerAdmin email address and the DocumentRoot path with your own details.
NameVirtualHost *:80

<VirtualHost *:80>
 ServerAdmin mail@your-email-address.com
 DocumentRoot "/home/USERNAME/website/"
 ServerName localhost
 ErrorLog logs/website-error_log
 CustomLog logs/website-access_log common
</VirtualHost>
By default, SE Linux does not like Apache (httpd) accessing user's home drives. If we want to store our website in our home folder then we need to do the following as root:
setsebool -P httpd_enable_homedirs 1
chcon -R -h -t httpd_sys_content_t /home/USERNAME/website
The first command allows httpd to access home directories, and the second command correctly labels the folder. You will have to relabel any new folders you create under the main folder (otherwise you may get a 403 error, "You don't have permission to access /folder/filename.html on this server").
Of course, one could probably omit the virtual folders and use the default httpd location of /var/www/html, but in order to add files to this folder you would need to alter the permissions using chmod / chown. Virtual folders are better (in theory) as they easily allow for multiple sites on the same server (identified by different IP addresses or by different hostnames).
Either way you decide to setup Apache, you need to manually start the service the first time (if you don't reboot). Do this as root using:
service httpd start
If you want the service to run at startup, do:
chkconfig httpd on
You should now be able to access your website at http://localhost or http://127.0.0.1.
Setting up NetBeans
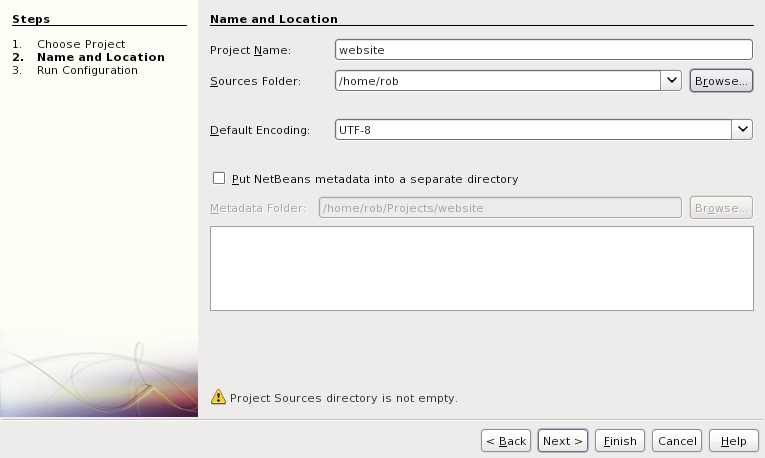
Start NetBeans and select Tools > Plugins. Install "PHP" from the list of available plugins. Then create a new project using: "File > New Project" as below:

Click for a larger image (opens in a new tab / window)
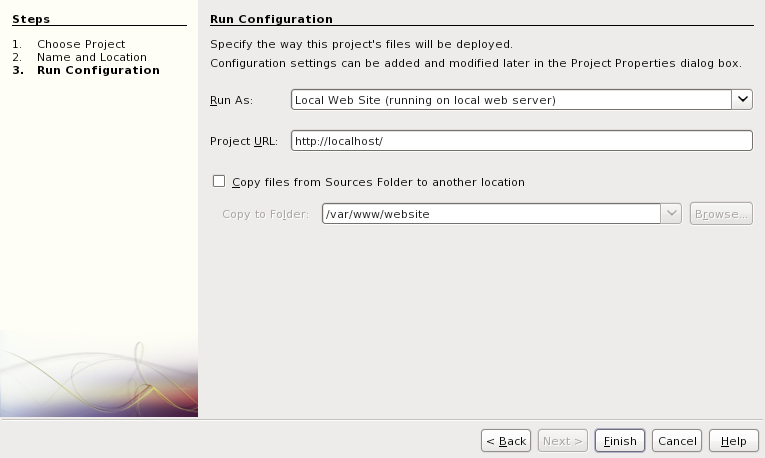
Click for a larger image (opens in a new tab / window)
Click for a larger image (opens in a new tab / window)
Adding a template
To add a template, select Tools > Templates. You should see a similar dialogue as the one shown below:
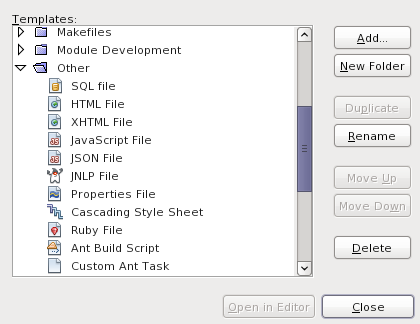
Select the Other category, then click Add. Navigate to the HTML file you want to use as a template and select Add again. You can use the Rename button to give the template a meaningful name. You should now have a template you can select when creating a new file. Use this same menu to edit the template, but note that if you change a template then the files that are based on it will not change automatically.
Using awk to make site-wide changes
Let's say you want to update some code throughout your site. You could go through each and every HTML page to perform exactly the same change but that would get tiresome pretty quickly. Now, if you've based your website pages around a single template as explained above, then a lot of the HTML source code is going to be the same. This means we can use a tool called awk along with some batch scripting to make the changes for us.
First we need to create a text file (I have used find.txt) in the same folder as your HTML files. This should contain the text you want to find, which can be a single line or multiple lines. This is what makes using awk for this procedure so useful; we can do a multiple line replace over multiple files in a single operation. Here's an example of what we might put in find.txt:
<p>
    <a href="http://www.calislahn.com"
      target="_blank">
        <img src="images/calislahn.png"
             style="height:40px;width:40px"
             alt="Calislahn.com">
    </a>
    <a href="http://www.calislahn.com"
       target="_blank">Calislahn.com</a>
</p>
We now need to create a replace.txt file, again in the same folder as your HTML files. In this instance, I'm adding an additional link to a website on all of the pages in my site, as you can see in the code below:
<p>
    <a href="http://www.calislahn.com"
      target="_blank">
        <img src="images/calislahn2.png"
             style="height:40px;width:40px"
             alt="Calislahn.com">
    </a>
    <a href="http://www.calislahn.com"
       target="_blank">Calislahn.com</a>
</p>

<p>
    <a href="http://jadshome.no-ip.org"
      target="_blank">

        <img src="images/jadshome.png"
             style="height:40px;width:40px"
             alt="JadsHome">
    </a>
    <a href="http://jadshome.no-ip.org"
       target="_blank">JadsHome</a>
</p>
Awk is more often used to format data from raw text, so it uses a record seperator, much like the comma in a CSV (Comma Seperated Value) file. In the script below, I have set the record separator to four line returns, which means you can have blank lines in your text as well. You can add more line returns by adding additional instances of "\n" if you have a lot of blank lines for some reason. Let's move onto the script... but first, a warning:
Do NOT attempt to run the code below until you have taken a backup of your website. SERIOUSLY. Even though the code below is designed to backup the files, I had a lazy moment and ran this direct from a terminal by copy and pasting it in instead of running it from an .sh script file as I should have done. The HTML files weren't backed up and the files outputted were 0k in size. Running the same code as an .sh script file worked fine. Fortunately I didn't lose too much data... you may not be so lucky!
BACKUPDIR=`date +backup_%d-%m-%y_%H.%M.%S`
mkdir $BACKUPDIR
for FILENAME in *.html
do
mv $FILENAME $BACKUPDIR/$FILENAME
awk ' BEGIN { RS="\n\n\n\n" }
      FILENAME==ARGV[1] { s=$0 }
      FILENAME==ARGV[2] { r=$0 }
      FILENAME==ARGV[3] { sub(s,r) ; print }
    ' find.txt replace.txt $BACKUPDIR/$FILENAME > $FILENAME
done
Ok, so as per the warning above, start off by copying the code to a text file and call it something like findreplace.sh - again this should be in the same folder as the HTML files. Make the script executable by doing:
cd PATH_TO_SCRIPT
chmod +x findreplace.sh
The script first assigns a variable called BACKUPDIR which will include the date and time the script was run, hopefully ensuring you don't overwrite one backup with another. It then creates the BACKUPDIR subfolder and begins a FOR loop which will run once for every HTML file it finds in the current folder. The pattern is set to look for *.html, so this script will not work on files with a *.htm, *.HTM, or *.HTML extension without modification - Linux is case sensitive remember!
Each file is moved at the start of the loop to the new backup subfolder, so that the original file is not overwritten.
Next the script invokes awk. The three 'FILENAME=ARGV' lines assign find.txt to the variable 's' and replace.txt to the variable 'r'. The line with 'sub(s,r)' completes the substitution on the file $BACKUPDIR/$FILENAME and outputs the result. Note that we have told awk what arguments 1-3 are in the next line down - effectively this is "file containing text to search for", "file containing text to replace with", "input file" (respectively). We redirect the output to an output file using "> $FILENAME"
To run the script (ensure you've done a manual backup if this is the first time you've run the script as noted above in red), use the following:
sh ./findreplace.txt
One final warning - you'll need to manually update the template file if the changes you made should affect any new files you create from templates, as this is stored under ~/.netbeans/6.7/config/Templates/Other/template.html. Of course, you could run the awk script on this file too by making a few modifications!
Sources
- http://hacktux.com/fedora/apache
- http://www.linuxhomenetworking.com/wiki/index.php/Quick_HOWTO_:_Ch20_:_The_Apache_Web_Server#Redhat_.2F_Fedora
- http://docs.fedoraproject.org/deployment-guide/f12/en-US/html/s1-apache-config-ui.html
- http://docs.fedoraproject.org/deployment-guide/f12/en-US/html/s1-apache-virtualhosts.html#s2-apache-settingupvhosts
- http://httpd.apache.org/docs/2.2/vhosts/examples.html
- http://httpd.apache.org/docs/2.2/vhosts/ip-based.html
- http://httpd.apache.org/docs/2.2/vhosts/name-based.html

